
Watch this article on video
We invite you to discover the video corresponding to our last article. This video will allow you to visualize the information presented in the article and to better understand the subject. Click on the link to access the video and feel free to share your opinion in the comments.
How to create a seller account on Amazon:
Step-by-Step Guide
Thinking of selling your products on Amazon, but don’t know how to create a seller account? Don’t worry, we’ve got you covered! In this article, we’ll walk you through the process of creating a seller account on Amazon and give you tips to help you achieve your goals.
Before you get started, know that creating a seller account on Amazon is a crucial step to start selling on the most popular online marketplace. With your seller account, you can create new products, adjust your prices, manage your inventory, drive your advertising campaigns, send emails to your customers, and much more.
Why sell on Amazon?
You may be wondering if you should create an Amazon seller account to sell your products online. An Amazon seller account provides you with all the tools you need to effectively manage your online selling business. But why Amazon, you might ask? Can’t you just sell your products on your own website?
You can create your own website to sell your products, but how will you promote it? People need to be able to find your site before they buy your products, which requires spending a lot of time and money on search engine optimization, advertising and other marketing efforts. But even then, there’s no guarantee that you’ll get enough traffic.
Selling on Amazon has many advantages. You can sell your products on the world’s largest marketplace. In 2022, 63% of consumers started their product search on Amazon. Why? Because of Amazon’s low prices, free or low-cost shipping, and user-friendliness, which convinced them to choose online shopping over shopping in physical stores. In addition, more than half of consumers shop on Amazon one to several times a week. Amazon has a built-in customer base with millions of Prime users.
To take full advantage of Amazon’s immense potential, you must first sign up as a seller on Amazon. But don’t worry, it’s easy and worth it. The next step is to choose your selling plan.
Choose your sales plan.
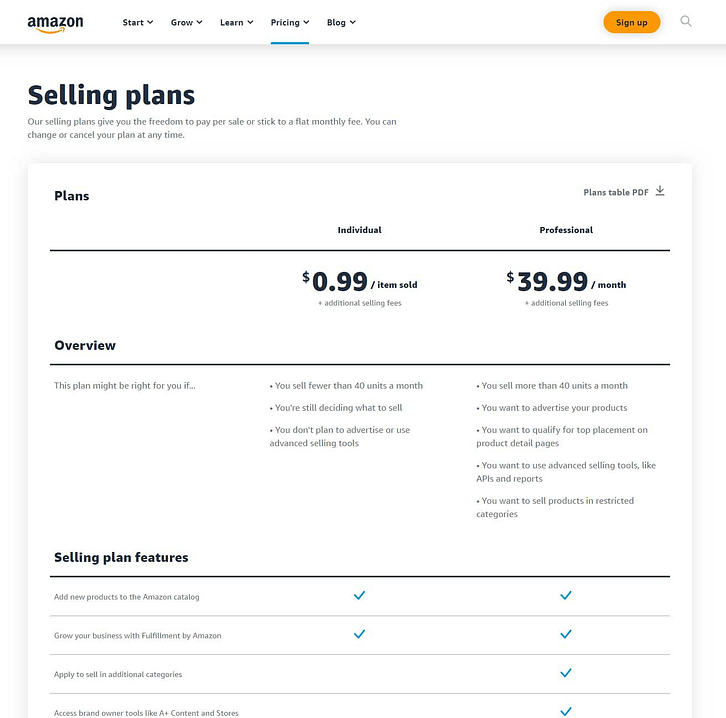
Amazon offers two sales plans: the individual plan and the business plan.
The individual plan is completely free to create, but there is a $0.99 fee for each of your sales. This is a viable option for sellers who plan to sell less than 40 items per month and don’t need advanced sales tools. Individual sellers do not have access to the Professional Plan inventory management programs, but this may not be necessary if you only sell a few items per month. However, individual seller products are not eligible for the Buy Box, and it may be more difficult to get your products noticed on Amazon.
The Professional plan costs $39.99 per month and does not charge a fee for each sale. This plan is best suited for sellers who plan to sell more than 40 items per month and need advanced sales tools. With the Professional plan, you can manage your inventory using Amazon’s advanced tools, access analytics and reports, and use Amazon’s advertising tools to promote your products. In addition, professional sellers’ products are eligible for the Buy Box, which can increase visibility and sales.
Create your Amazon seller account
Congratulations! In a few moments, and after a few formalities, you will be a brand new Amazon seller. But be careful! Before you get started, you need to make sure that your country is authorized to sell on Amazon. Gather all the necessary documents, such as your business email address or Amazon customer account, an international credit card, an ID issued by your government, and your tax information. Don’t forget to have a valid phone number and bank account so that Amazon can send payments for your sales. Once you have all of these documents, you can begin the registration process by following these steps.
Choose your sales plan
Let’s start at the beginning. First, you will choose your sales plan. To make sure you start your listing on the right Amazon page, go to the Google search engine. Type in “sell on Amazon.” Depending on your country of residence, you will be directed to the right Amazon page.
First, you need to select your selling plan. To do this, go to the menu at the top of the Amazon page, under “Compare Sales Plans”.
You will then be directed to the individual and business sales plan comparator. As we saw in the previous step, you will choose your plan by clicking on the corresponding button at the bottom of the corresponding plan column.
Email address verification
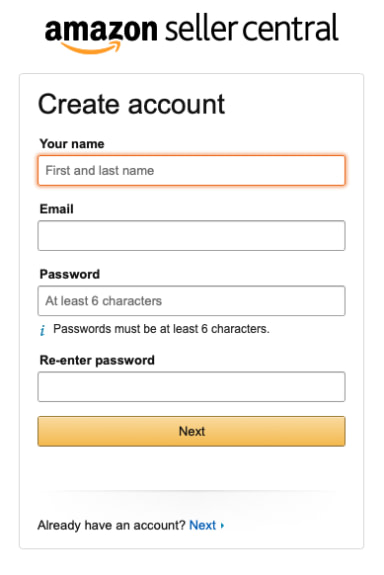
Amazon will now verify your email address. After selecting the selling plan that is right for you, a window will appear asking you to enter your email address and choose a password for your seller account. Once you are done, click the “Next” button. Amazon will send you a code.
You will then be directed to a second screen indicating that you must enter a verification code sent to your email address. This is Amazon’s verification procedure for the email address you entered.
Go to your mailbox, open the message from Amazon and copy the code. Then come back to this second screen and paste the code into the field provided. Then click on the “Verify” button.
The necessary documents
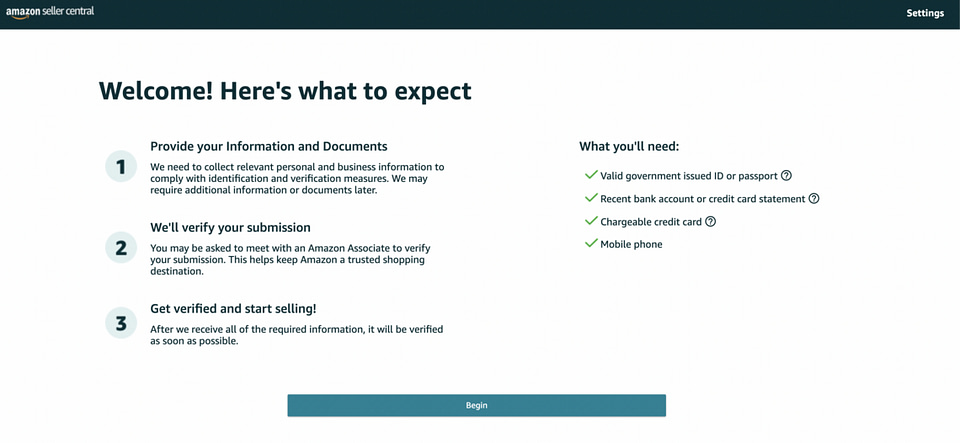
Once you have entered the verification code, you will be automatically redirected to this screen.
Amazon will show you the documents you will need to complete your registration: a valid ID or passport, a bank statement or credit card, and a cell phone.
Click the “Begin” button.
Information about your company
The next step in the registration process is to enter your business information.
Amazon will ask you to enter the location of your business. This location is where you have legally registered your business. However, if you don’t have a company yet, simply enter your country of residence. It is extremely important that this information is accurate, as Amazon will verify it later.
Next, enter your company’s legal form. Select your business type from the following options: Private Business or Charitable Organization, for example.
If you haven’t created a business yet, select “None, I’m an individual”. If you choose this option, Amazon will ask you for your full name in the next step.
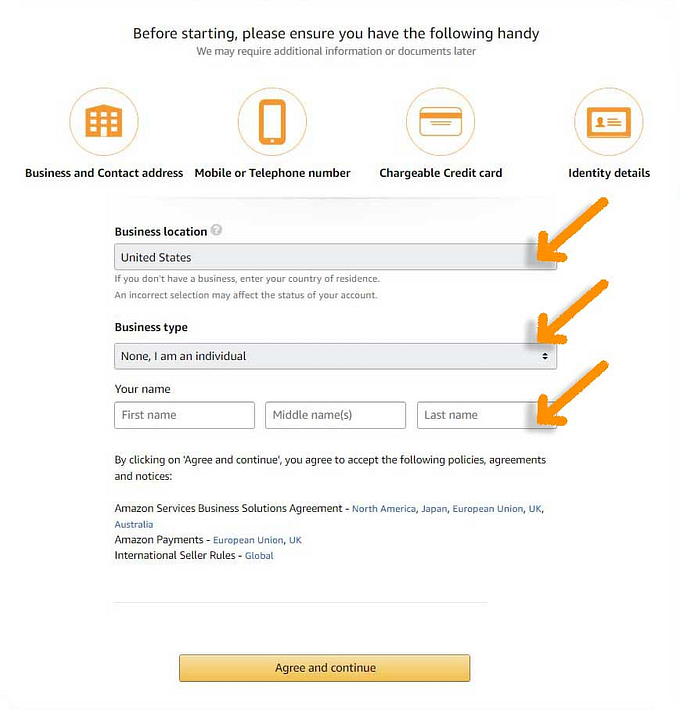
Once you have provided this information about your company, you will be asked to enter your full name, then click Accept and continue.
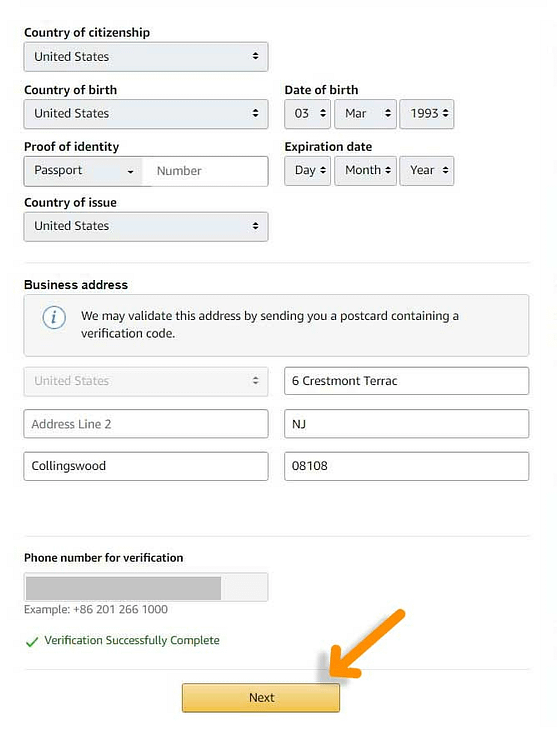
Your country of citizenship and birth
On the next screen, you will be asked to indicate your country of citizenship and birth. You will also be asked to select an identification document. You will be able to choose between your driver’s license, passport or ID card. Now enter your company address. If you do not have a business, this is your home address. Be sure to enter a valid address, as Amazon will send you a verification code via postal mail.
You must also enter your phone number. Enter a valid phone number, as Amazon will contact you by phone or SMS to verify it and give you a PIN. Enter the PIN you received from Amazon in the field provided so that Amazon can verify it.
After entering your information and verifying your phone number, click Next.
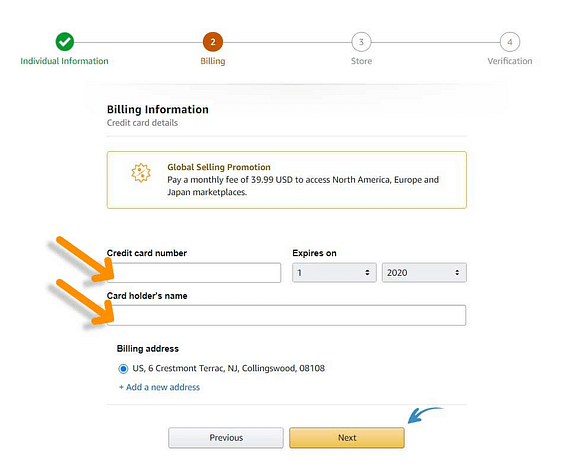
Your credit card number
On this new screen, you will enter your credit card, so that you will be charged the $39.99 monthly fee from Amazon.
After entering your credit card information, click next.
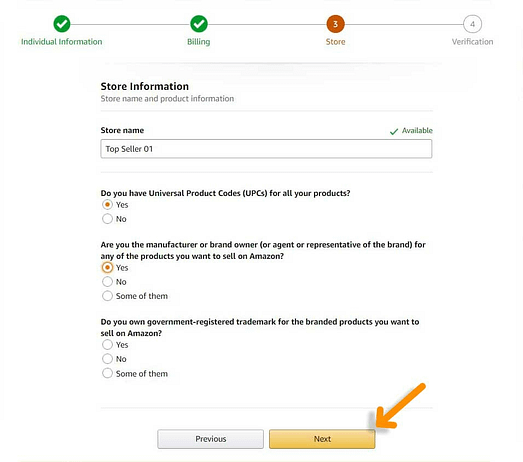
Questions about your Amazon store and your products
After providing your credit card information, you will be asked a few questions about your Amazon store and the products you plan to sell.
You will need to answer the following questions:
What is the name of your Amazon store? This is the name that customers will see on Amazon. Don’t choose a name that is too specific, as you will be able to diversify into several different niches. You will, however, have the opportunity to change your store name over time.
Amazon will ask you whether or not you have UPC codes for your products. If you don’t know, click Yes.
You will be asked if you are the manufacturer and/or brand owner of the products you sell.
If you answer “Yes”, Amazon will ask you if you are the brand owner of these products.
Once you have answered the questions, click Next to continue.
Verification of your identity
This is the final step in creating your seller account.
Amazon will verify your identity. You will need to upload a photo of your ID, driver’s license or passport, and a bank statement.
Once you have uploaded these documents, click Submit.
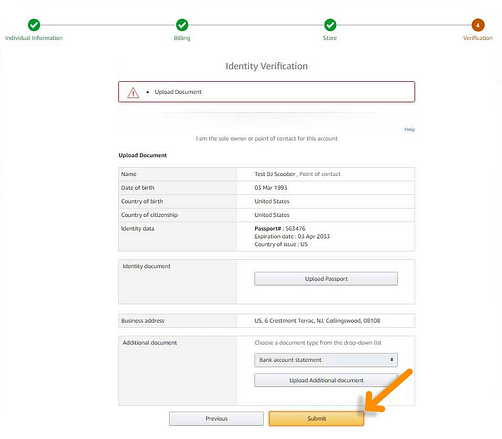
Once you have submitted all your documents, you will be invited to an identity verification video call with an Amazon consultant. They will verify all the documents and personal information you submitted.
This is unfortunately part of the process. So it’s a good idea to get this verification done as soon as possible so you can start selling products on Amazon. If you would like to schedule an appointment at a later date, you can do so at that time.
Your account is under review. In most cases, your account will be approved within 24 hours. However, if you have a problem with any of your information or have entered it incorrectly, the process may be delayed. If there is a problem with any of the information you have provided, an Amazon representative will contact you so that you can correct it. Please be sure to verify all of the information you have provided and use only accurate information. Otherwise, you will have to wait longer before you can start selling.
Once your account is approved, you will be able to log into Seller Central, where you can add products and start creating your listings.